Static Bowties Don’t Prevent Incidents: How to Turn Bowtie Analysis into Real-Time Critical Control Management
Bowtie analysis is a powerful way to visualise major-event risk—but too often it becomes a static diagram that’s built once and then forgotten. This article shows how to turn Bowties into a living Critical Control Management approach, with clear ownership and ongoing verification so you can prove your critical controls are working in real time.
.png)
Bowtie analysis has earned its place in modern safety practice for one simple reason: it makes complex risk easy to see. In one visual, you can show what could trigger a major event, what happens if it does, and what controls stand between your people and harm.
But there’s a trap many organisations fall into: the Bowtie becomes a “poster”. It’s built during a workshop, approved, filed… and gradually drifts out of date. Meanwhile, work changes, conditions change, people change—and the controls you think are protecting you may be weakening in the background.
A Bowtie is powerful. But it’s most powerful when it’s operational—when it’s connected to ownership, verification, and real-time control assurance.
Below is a practical guide to building Bowties that don’t just look good on paper, but actively support Critical Control Management (CCM).
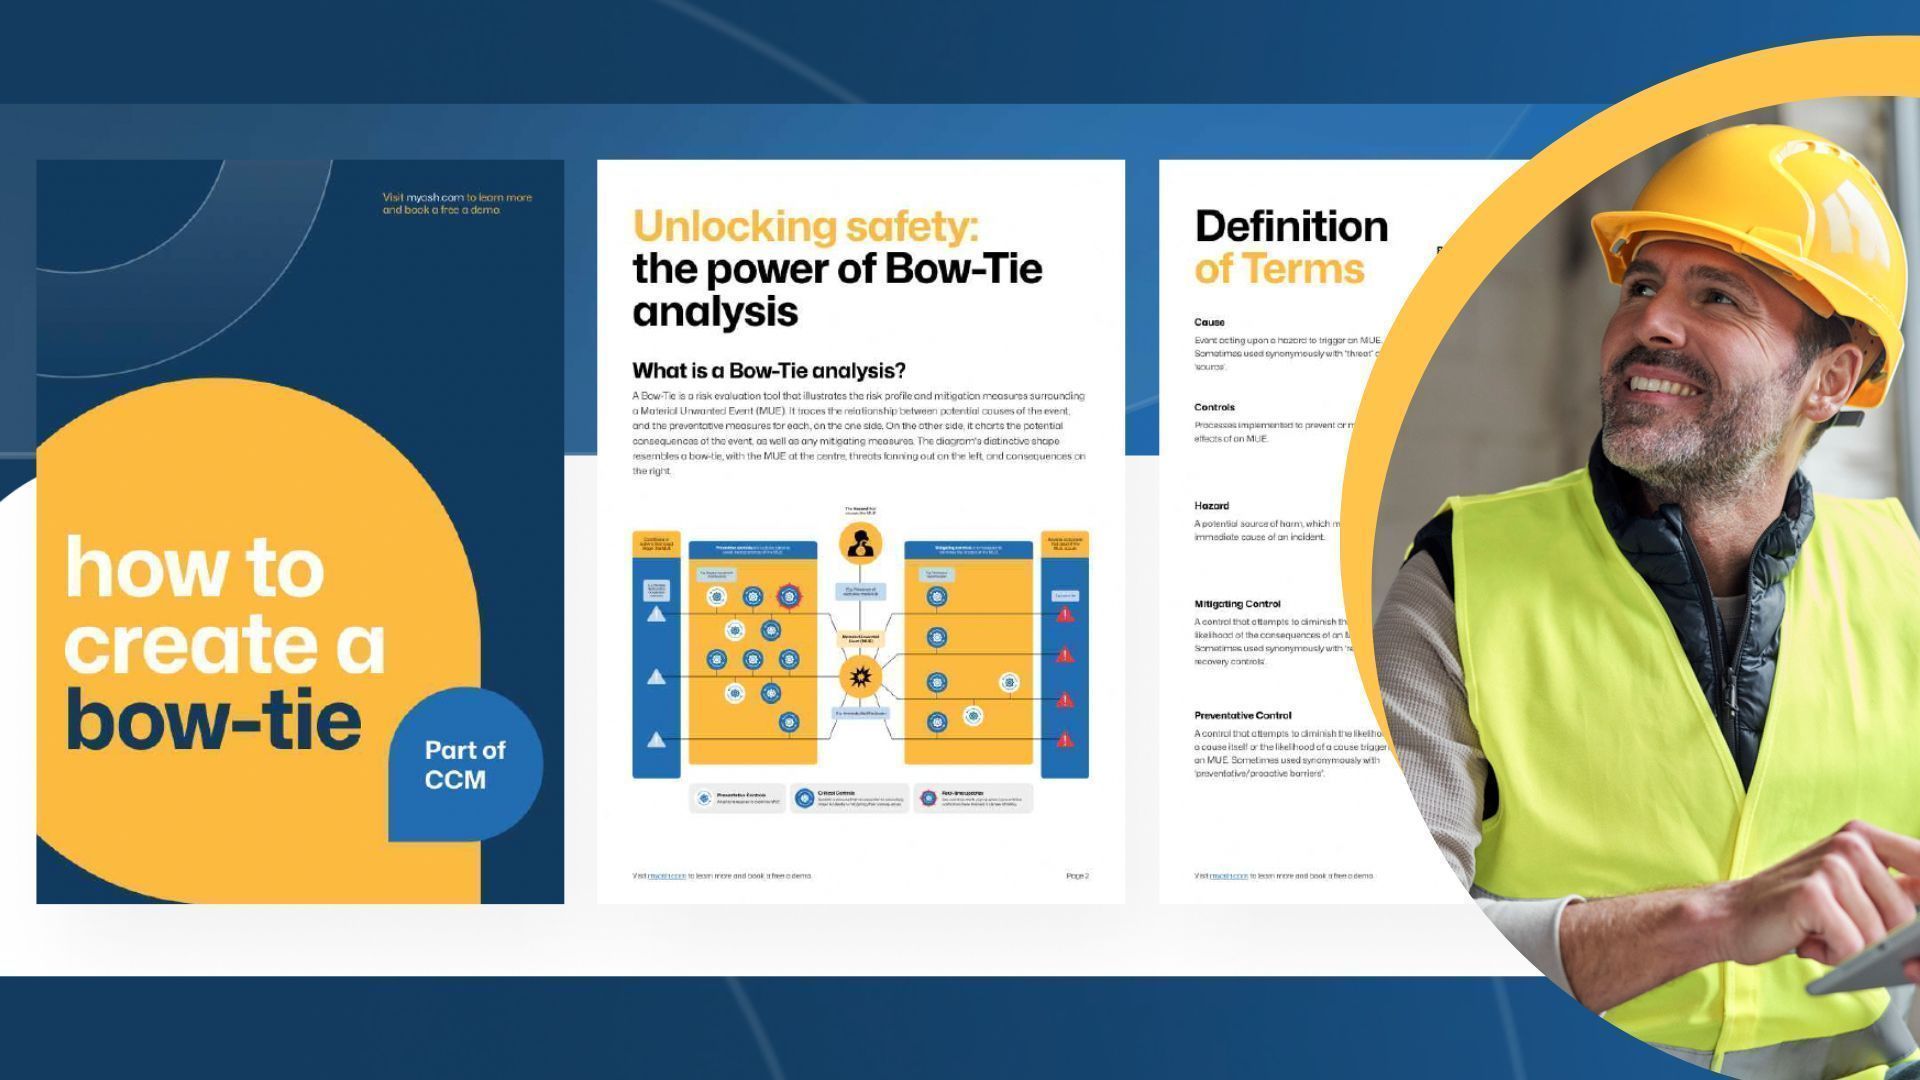
What Bowtie analysis is (and why it works)
A Bowtie is a risk evaluation tool that illustrates the risk profile and mitigation measures around a Material Unwanted Event (MUE). It maps:
- Threats/causes on the left (what could trigger the event)
- Consequences on the right (what could happen if it occurs)
- Preventative controls that stop the event from occurring
- Mitigating controls that reduce the impact if it does occur
That shape—threats fanning out on the left, consequences on the right—is exactly what makes Bowties so effective. People can immediately understand the risk story and where controls fit into daily work.
The vocabulary that keeps Bowties clear
Most Bowtie confusion comes from inconsistent language. Get these terms aligned early:
- Hazard: the potential source of harm (the “thing” that can hurt you).
- MUE (Material Unwanted Event): the central major event you’re trying to prevent (the “top event”).
- Cause / threat: the conditions or actions that could trigger the MUE.
- Consequence: the downstream adverse outcomes if the MUE occurs.
- Preventative controls: controls that reduce the likelihood of the MUE.
- Mitigating controls: controls that reduce the severity/impact of the consequences.
- Critical controls: the controls that matter most—where failure significantly increases risk.
When your teams share a common definition set, the Bowtie becomes a practical tool instead of a debate.
The 6-step method to build a Bowtie that supports CCM
1) Identify your hazards
Start by identifying the key sources of harm in your operations. Look at tasks, environments, equipment, energy sources, substances, and interfaces between people and plant. Focus on hazards that could realistically lead to high-consequence events.
Tip: Don’t try to Bowtie everything. Start with the hazards tied to your highest potential consequence scenarios.
2) Define the Material Unwanted Event (MUE)
Your MUE should be a clear, specific statement of the major event you want to prevent or control.
Good MUEs are:
- Observable (“loss of containment”, “uncontrolled release”, “vehicle rollover”)
- Not too broad (“incident” is too vague)
- Not too detailed (save contributing factors for threats/causes)
3) Identify threats (causes) and consequences
Now map:
- Threats: what could act on the hazard to trigger the MUE?
- Consequences: what adverse outcomes could follow if the MUE occurs?
This is where you build shared understanding across operations, maintenance, safety, engineering, and frontline teams—because the best Bowties reflect what really happens in the field, not what the procedure says should happen.
4) Establish preventative and mitigating controls
For each threat, ask: What stops this from triggering the MUE?
Those are your preventative controls.
For each consequence, ask: If the MUE occurs, what reduces harm?
Those are your mitigating controls.
You’ll usually find a mix of:
- Engineering controls (design, guarding, interlocks)
- Administrative controls (procedures, training, permits)
- Operational controls (inspections, maintenance, supervision)
- Emergency controls (response plans, first aid, recovery systems)
5) Identify critical controls
Not all controls are equal. Some controls, if they fail, dramatically increase risk even if other controls exist. These are your critical controls.
A control can also be “critical” if it supports multiple MUEs across the site (for example, communications systems or emergency response capability). When that kind of control degrades, risk rises everywhere.
Practical way to test “criticality”:
- If this control fails, does risk jump significantly?
- Would we still feel “safe enough” relying on the remaining controls?
- Does this control apply across multiple high-risk scenarios?
If the answer is “yes”, treat it as critical—and manage it accordingly.
6) Monitor and maintain critical controls
Here’s the difference between a Bowtie that’s “nice” and a Bowtie that actually reduces risk.
To keep the Bowtie meaningful, you need ongoing monitoring—through inspections, performance testing, verification activities, and analysis of results. Controls should have:
- An owner (a role or person accountable)
- A defined performance requirement (what “good” looks like)
- A verification method (how you prove it’s effective)
- A verification frequency (how often you check)
- A clear response when it’s not effective (what happens next)
When you do this well, the Bowtie becomes the blueprint for CCM: it tells you what must not fail, and how you’ll know if it is failing.
The “control assurance gap”: why static Bowties fall short
Traditional Bowties are usually static—they show relationships, but they don’t tell you when a critical control is drifting, overdue, incomplete, or ineffective.
That’s the control assurance gap:
- You have the map…
- But you don’t have the live signal.
This is where many organisations struggle. The Bowtie exists, but verification evidence is scattered: spreadsheets, emails, paper checklists, inspection forms, maintenance systems, and tribal knowledge.
Why a digital Bowtie changes the game
A digital Bowtie helps close that gap by connecting the Bowtie model to the work that keeps controls effective.
The benefits are practical:
- Faster and more accurate maintenance of the Bowtie model (less rework, fewer version issues)
- Better documentation for compliance and audit readiness
- Real-time updates as operations change and lessons are learned
- Clearer communication across teams (one visual truth everyone can access)
- Integration with safety systems and workflows
- Continuous improvement driven by verification data and trends
In other words: the Bowtie stops being a diagram—and becomes a living system.
10 ways to make Bowtie analysis stick (and common traps to avoid)
Here’s what separates high-performing Bowtie programs from documents that look good in a folder but don’t get used day to day:
Best practices
- Use a multidisciplinary team (operations, maintenance, engineering, safety, supervisors).
- Review and update regularly—especially after changes, incidents, audits, or verification insights.
- Integrate Bowties into your broader safety management system, not as a standalone exercise.
- Use software tools to manage updates, evidence, and visualisation efficiently.
- Assign ownership and accountability for MUEs and critical controls—someone must “own the signal”.
Common pitfalls
- Overcomplicating the diagram—keep it readable, link out to supporting documents.
- Ignoring “minor” threats and consequences—small issues can compound into major risk.
- Failing to train stakeholders—if people don’t understand the Bowtie, they won’t use it.
- Not aligning to regulatory expectations—Bowties often form part of “show me” compliance evidence.
- Skipping continuous improvement—the Bowtie should evolve as your operation evolves.
Bringing it together: Bowties + CCM in one system
When Bowtie analysis is connected to Critical Control Management, your organisation gains something priceless: confidence.
Confidence that:
- critical controls are owned,
- verifications are happening,
- failures are visible early,
- and the story of risk is consistent from frontline to leadership.
That’s the goal—not just producing Bowties, but using them to prevent major events.
If you’d like to see what a connected, digital Bowtie approach looks like in practice, myosh can help you link Bowties to control verifications, inspections, hazards, incidents, and corrective actions—so your Bowties stay current, usable, and audit-ready.
Get your copy of the Bowtie guide
